
Assembly/Installation/Mounting Instructions for the KayaArm Launch Dock Products
Be sure to also read our
Frequently Asked Questions section.
THIS MANUAL CONTAINS IMPORTANT SAFETY INSTRUCTIONS
- BEFORE USING YOUR KayaArm, READ AND UNDERSTAND THIS OWNER’S MANUAL.
- WIRSIG ENTERPRISES INC. AND THE RETAILER CANNOT BE HELD RESPONSIBLE FOR DAMAGES OR INJURY SUFFERED AS THE RESULT OF FAILURE TO FOLLOW THE INSTRUCTIONS AS SET OUT HERE-IN.
- Printable Assembly Instruction Manual
Below are some additional helpful instructions including video tutorials regarding the KayaArm Launch Dock product.
Click on the arrow below to open the instructions.
Suggested Operating Instructions
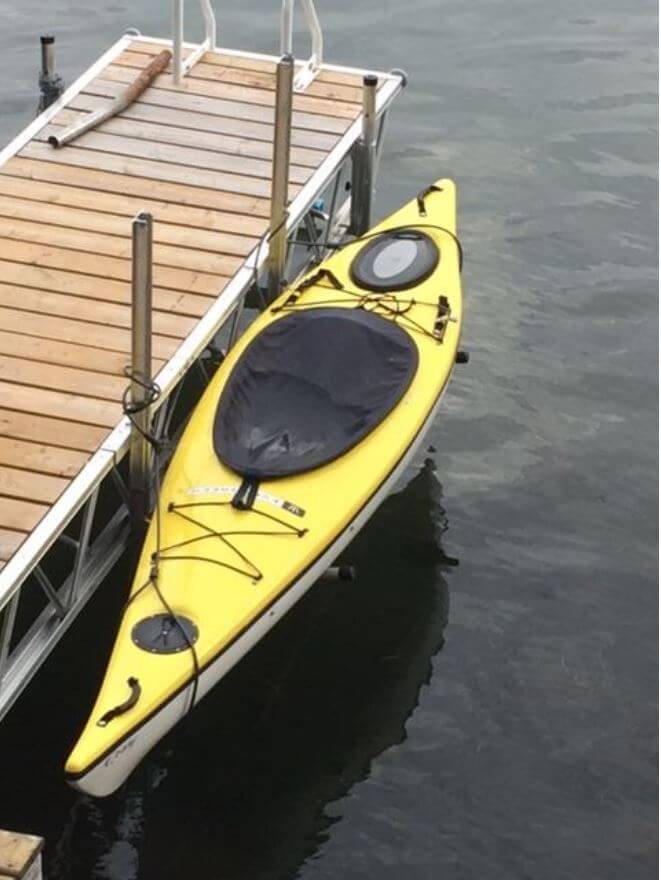
- Arm Height: By gripping and lifting on the chain (6) adjust and fix the arm height to the desired level relative to the water surface. Generally the outboard end of the arm should be about at the water surface or a little above it. For floating docks it may need to be a little higher. At no time should the arm be completely out of the water as this makes sliding off difficult aside from putting excessive strain on the arm joint especially when sliding off the arm during launch.
- For entry and launch, maneuver the kayak into position over the arm (3) with the arm usually about 4 to 10” forward of the cockpit although this depends on the shape of the cockpit. Alternatively, the arm should be about 1 to 2 ft. forward of where you step into the kayak—the arm must not be under foot. Prior to step-in the kayak should still be mainly floating.
- Place the paddle on the dock beside the kayak
- With a steadying hand on the top of the mast (1) step into the kayak. At this point the kayak should be in contact with and stabilized by arm (3). HINT: If it is not stabilized get out and raise the arm in increments of one chain link until it is stabilized when you step into the kayak.
- Once standing on both feet in the stabilized kayak let go of the mast and with both hands on the gunnels maneuver yourself to the normal sitting position.
- Pick up the paddle and push off with one hand from the dock in the reverse direction. HINT: Difficulty in pushing off may be due to the arm height being too high.
- The return to dock and exit procedure is the reverse of the above entry and launch procedure. This includes using only the gunnels (not the mast) to bring yourself from a sitting to a standing position. Do not use the mast as a steadying post until you are ready to step out.
- If you have difficulty lifting yourself from a sitting position to a standing position you may use the following procedure (proven by my wife) to exit the kayak:
- Bring your kayak up on to the arm (to the same location used for entry)
- Fasten the “added rope” (this is a big help to keep the kayak from sliding back off the arm)
- Then wiggle yourself around in the cockpit until you are in a kneeling position facing the rear of the kayak
- Then crawl on hands and knees out of the kayak onto the dock
Kayak Storage at the Docks
- Install two KayaArms on your dock about 5 ft. apart. Set #1 KayaArm arm at the normal kayak launch/return height where the “V” is approximately just below the water and set #2 KayaArm arm height well below the water surface.
- Maneuver your kayak onto #1 KayaArm as you would upon return from a kayaking excursion where the #1 arm is located forward of the cockpit and #2 KayaArm arm clears the aft bottom of the kayak.
- Procedure for raising the kayak (or canoe) to the storage position onto the two arms:
- From the kayak aft position grip the aft handle and slide the kayak forward to a position where most of its weight is temporary on arm #1. While balancing the kayak in that position with the one hand, raise the unloaded arm #2 with your other hand to several inches above arm #1 height and then slide the kayak in the aft direction to a location where it is sitting on both arms.
- From the kayak fore positon grip the fore handle and slide the kayak in the aft direction to a position where most of its weight is temporarily on arm #2. While balancing the kayak in that position with the one hand, raise the now unloaded arm #1 with your other hand to a height matching arm #2 and then slide the kayak in the fore direction to a location approximately centered between the two arms.
- The above steps #1 and #2 taken together comprise one lift. You may want to do a second lift by repeating steps 1 and 2 to raise the kayak to the desired height above the water.
- Then optionally turn the kayak over and fasten it down onto the arms. Instead of using the bungie straps hooked into the KayaArm chain as shown in earlier photos, I now use ropes positioned snugly around the kayak and KayaArm mast fastened with a Nite Ize Figure 9 rope gripping device which can be purchased online or at a local hardware store.
- And in a northern climate where kayak winter storage is a need you can use the above two KayaArms for that too—see photos below
Tide Pulley Assembly Instructions
To be used with the KayaArm on a fixed dock in tidal waters The Tide Pulley, when affixed to one of the attachment holes at the upper end of the KayaArm mast, enables height adjustment of the KayaArm arm that may be needed due to tide level changes upon return from a kayaking excursion. This arrangement consists of attaching the Tide Pulley assembly, replacing the chain with a rope and for tying off the rope adding a cleat at a location that is reachable from the returning kayaker in their kayak.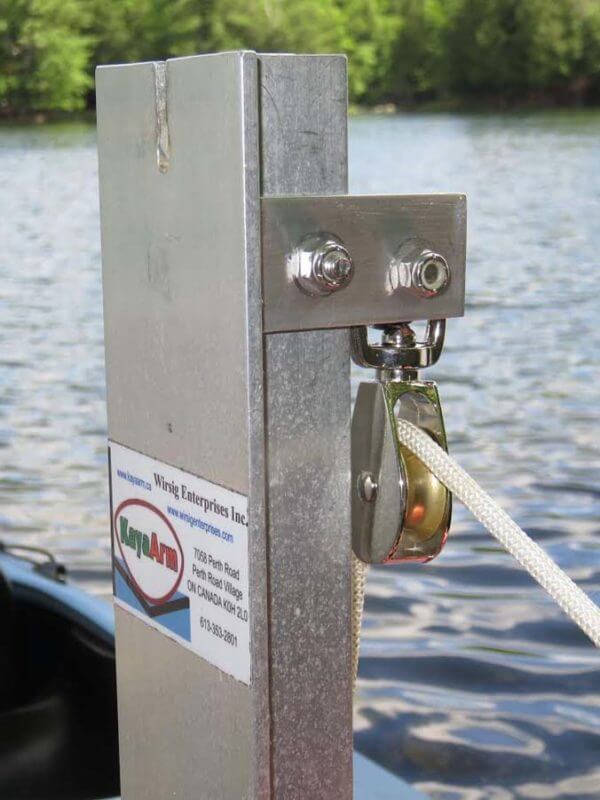
You Will Need:
- Tide Pulley
- Rope (1/4” polypropylene, twisted type vs braided for low stretch or a length of steel cable)
- Cleat or chain hook
- 7/16” wrench
After attaching the Tide Pulley, swap out the chain for your selected rope. After this you will need to decide where to affix your cleat/hook. The photos show two possible locations for an anchor-cleat or hook for tying off the rope and one photo shows the chain added onto the end of the rope enabling chain link adjustment increments. Some experimentation will be needed to determine the best location for the cleat or hook.
Key considerations are accessibility from the dock and from the water while in the kayak as well as keeping the path clear for entering/exiting the kayak.
View more details
Winter storage on a shed or garage wall
Procedures for Mounting Brackets on the Wall- Remove both KayaArm assemblies from the dock.
- Using one KayaArm assembly as a template install mounting brackets (one set for each arm spaced about 5 ft apart) on a wall as shown in the photos below. The materials (not provided) consist of common items such as short pieces of 2×4, screws and nails. This one time effort for installing these brackets enables quick seasonal mounting and dismounting of the KayaArm assemblies.
- Mount the KayaArm assemblies onto the mounting brackets and adjust the arms to equal heights.
- Place one kayak onto the arms and if needed hang another beneath them.
The addition of a rope for added stability

Christopher Maher of WATERFRONT LODGE CAMP MI-WOK at http://www.adkbyowner.com/listings/VR8019.html has come up with a great idea which will be helpful for some by adding some extra stability to kayak entry/exit using KayaArm. It consists of adding a rope from the kayak seat mount to a dock cleat to keep the kayak from sliding back on the KayaArm arm during entry/exit maneuvers. See his videos at the following links:
How to use KayaArm with the Pungo 120 kayak
How to use KayaArm with the Field and Stream angling kayak
Christopher said “It worked for most folks who visit our camp without the rope, but for some folks the added stabilization with the rope was key. I love your product; it is easy, effective, and so small”.
KayaArm Coverings
Experience demonstrates that no covering on the arm works well for most Kayaks. For some hulls to avoid hull marking a covering of inexpensive black polyethylene pipe is very effective. The gentle “V” shape of the arm along with the black polyethylene cover tends to spread the load and thus a concern for possible stiff hull damage has not been observed. But as a precaution in the case of stiff hulls the kayaker should be sure to have the arm forward of the cock pit and not under foot when stepping into or out of the kayak. A polyethylene cover over the arm can consist of the following:
- Cut two pieces black utility grade polyethylene pipe 11” in length. Pipe diameter can be 3/4” but 1” is easier to work with as is utility grade vs thicker grades.
- Slit the two pipe pieces and slip them over the top surface of each wing of the arm.
KayaArm shoe covering:
As with the arm no covering on the shoe works well for most Kayaks. If needed, a 12” long piece of slit ½” poly pipe utility grade slipped over the shoe flange works well. Alternatively, use a couple layers of black electrical tape.
While the assembly and operation of the KayaArm is largely intuitive these tutorials provides detailed instructions to ensure optimum and safe operation.
HOW TO ASSEMBLE THE KAYAARM VIDEO TUTORIAL
HOW TO INSTALL THE KAYAARM VIDEO TUTORIAL
Mounting Onto Different Types of Docks
Click on the arrow below to open the instructions and video tutorials.
Mounting the KayaArm onto a fixed or floating dock:
- While the water space beside the dock needs to be large enough for the kayak, the actual dock space required for the KayaArm and for entry/exit maneuvers can be as little as 3 to 5 ft (1 to 1 ½ meters).
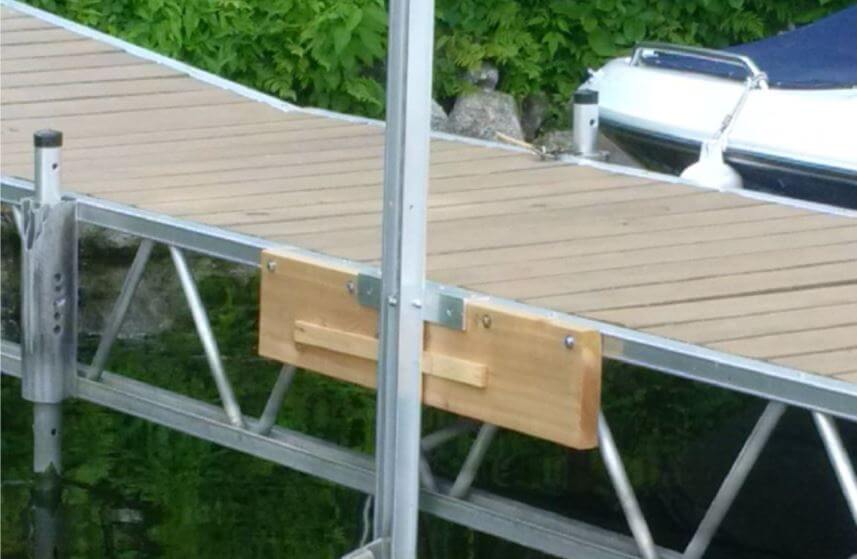
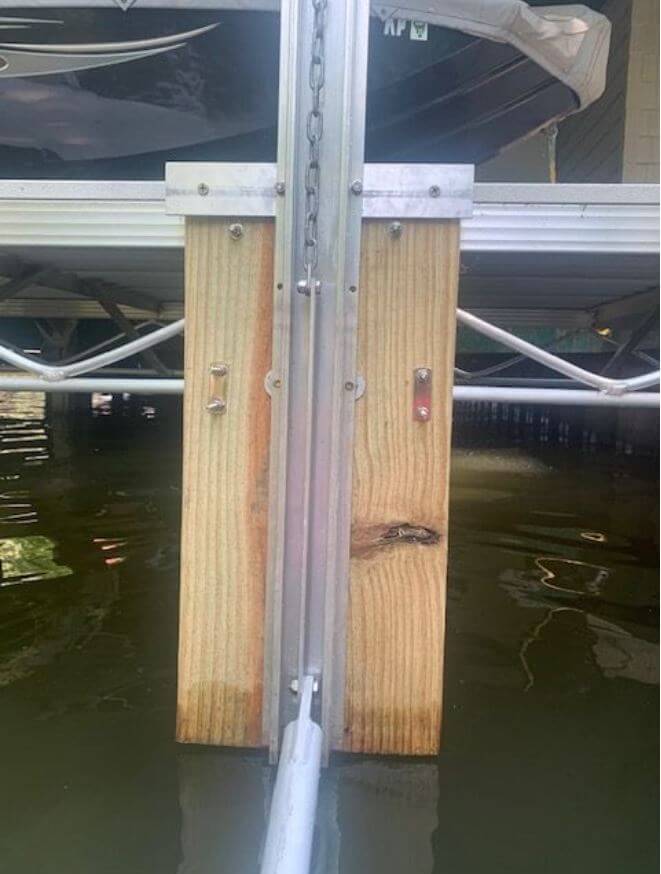
- Mounting details will vary depending on dock construction. The following is one example for mounting on a straight sided wooden dock (Refer to Figures 1 & 2 below or as per the manual ):

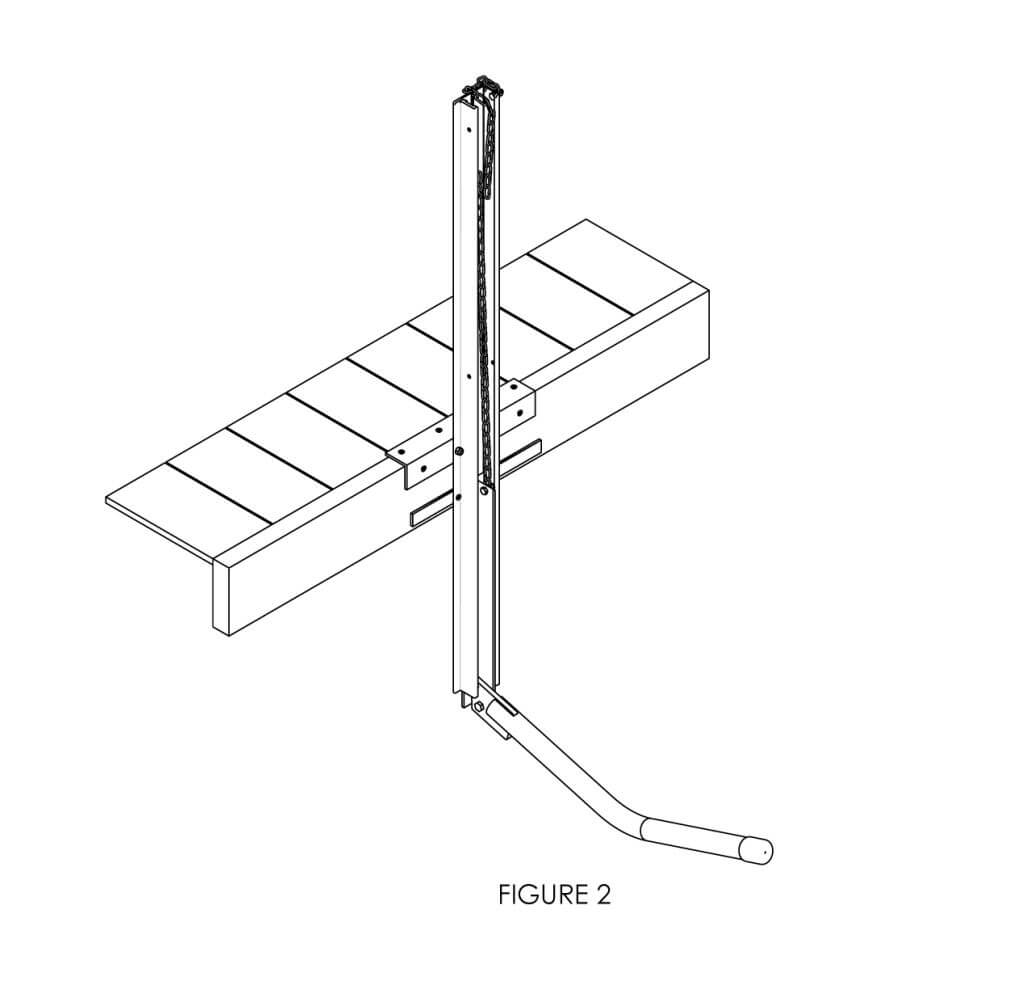
- Place the assembled KayaArm onto the edge of dock and fasten it to the dock using at least 2 deck screws (not provided) into the top surface of the angle (4). Fit the cedar shims into the approximately 1/4″ space between the back of the mast and the vertical surface of the dock (see Figure 2) at a location directly behind the lower holes in the mast flanges. HINT: Push the tapered shims, simultaneously one from each side of the mast and one in front of the other, into the space behind the mast to a distance where this space is filled when the mast is vertical. Install 2 deck screws (not provided) into the lower flange holes. Optionally install more deck screws through additional holes provided in angle (4).
Mounting the KayaArm to a ladder on a fixed or floating dock:
Note: Photos were made using earlier prototype KayaArm versions which are functionally the same as but appearance wise different than the design commercialized.
 An early prototype demonstrating how KayaArm can be mounted with 2 bolts onto a ladder on a dock, thus enabling large (unlimited) level differences between dock surface and water.
The KayaArm mounted as above on a dock is functional to a water level about 30” below the top of the dock. For water levels below that you may attach the KayaArm to the side of a ladder with two bolts (not provided) through holes provided in the mast (1). See adjacent photo and “ladder demo” video below.
Ladder Demonstration:
KayaArm mounted on a dock is functional for top of dock to water level differences of up to about 30”. For differences greater than 30” you may attach the KayaArm to the side of a ladder enabling kayak entry/exit off the ladder at essentially any distance from the top of the dock.
Mounting KayaArm onto a wood block beside a ladder:
As an alternative to mounting the KayaArm to the side of a ladder I recently made a block about 18” long out of two 2x4s and two 2x6s for mounting the KayaArm onto the dock beside a ladder. The inner 2×6, which may need to be longer than 18”, must be fastened (with the 5.5” side of the 2×6 against the side of the dock) firmly onto the side of the dock. Using 2.5” to 3” deck screws, then mount the two 2x4s spaced apart and perpendicular to the flat surface of the inner 2×6 so as to provide the sides of the box. It would be easier to fasten these 2x4s to the 2×6 before fastening that 2×6 to the dock. Then mount the outer 2×6 to complete the box. Then onto the outer 2×6 of this block I mounted the KayaArm. With this arrangement the aluminum angle and the wood shims provided are not needed.
How to mount KayaArm onto any metal dock:
The KayaArm can be installed on a metal dock. Attached are a few examples of how:
To mount KayaArm onto any metal dock all that is needed is to first bolt a short piece (at least 2 ft. long) of 2″x8″ (or 2”x6”) onto the side metal beam of the dock. Attach the 2×8 such that its top edge is flush with the top of the dock (or a little above the dock). Then mount KayaArm onto the 2×8 with deck screws just as you would to a wood dock as described in the assembly/mounting instructions. The attached photo, sent by a happy customer, is a good example of how to do it.

The photo below shows installation of 2 KayaArms to a metal dock. Extra holes were drilled in the mast at the height of the lower metal stringer (below the webbing) to secure the KayaArm to both the upper and lower metal stringers.
The photo below shows installation of 1 KayaArm to a metal dock. A 2×6 was thru-bolted to the upper stringer of the dock. Ideally, there should be another 2×6 secured to the bottom metal stringer as well (you will need to drill extra holes in the mast at the appropriate height), or at a minimum, with U-Clamps to the metal webbing of the dock. Mounting to 2×6 boards facilitates easy removal of the KayaArms in winter.
The following installation is from a customer who thru-bolted through the metal stringer, as well as using U-bolts to secure the rot-resistant board to the metal webbing of the dock. This makes for a more secure installation.
How to mount KayaArm onto a plastic dock
A simple way is to firmly mount a 2×8 piece of wood (say 2 or more feet long) directly onto the side of the plastic dock. Use any brackets that usually come with plastic docks (e.g. the EZ Dock brackets). Then just screw the KayaArm into the 2×8 as shown in the “Printable KayaArm Assembly Instructions” Note figures 1 & 2.
manual ):
For plastic docks, please check with your dock manufacturer for mounting accessory hardware.
Warranty:
This product carries a one-(1)-year warranty from date of purchase against defects in workmanship and materials. This product is not guaranteed against wear, breakage or misuse. Should this product become defective within the stated warranty period, contact Wirsig Enterprises Inc. at www.wirsigenterprises.com for an evaluation of the situation to figure out what needs to be done to take care of things including free shipment of replacement parts. This warranty does not cover labour costs for any repairs and generally does not cover product return shipping costs. Exchanges or repairs made under this warranty do not extend its limit.
CAUTION:
- DO NOT DIVE OR JUMP OFF THE DOCK INTO THE WATER NEAR THE INSTALLED KayaArm. DOING SO MAY CAUSE PERSONAL INJURY.
- BE AWARE OF THE PRESENCE OF THE PROJECTING ARM BESIDE THE DOCK AT AN INSTALLED KayaArm.
- BE AWARE OF THE MAST AND MOUNTING BRACKET AFIXED TO THE SIDE OF THE DOCK AS OBJECTS NOT TO BUMP INTO OR TRIP OVER.
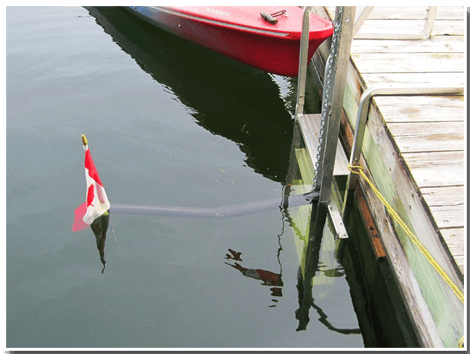
- IF THE DOCK SPACE AT THE KayaArm IS NEEDED FOR OTHER PURPOSES (E.G. SWIMMING OR MOTOR BOATING) SLIDE THE TETHERED BENT ARM AND SHOE ASSEMBLY UP OUT OF THE TOP OF THE MAST AND HANG IT OUT OF THE WAY IN THE WATER BESIDE THE DOCK.