
1. What materials are used to manufacture KayaArm? Will it stand up to salt water?
To enable KayaArm use in salt water we use stainless steel bolts, galvanized chain and a 6061-aluminum alloy for the bulk of the device. The aluminum alloy has good saltwater resistance and should be good for many years in both fresh and salt water.Feedback on KayaArm purchased in 2013 in salt water:MORE TESTIMONIALS
Hello, thank you for your follow up. The KayaArm is doing fine. As expected I do have growth on the portion of the frame that is below the tide line but not an issue. No indication of corrosion, I am very happy with it and certainly feel free to share my email to interested customers.
2. How much weight does the KayaArm hold?
The arm supports only a portion of the kayaker’s weight during entry and exit and the buoyancy of the kayak in the water supports the bulk of the weight. As a result, the kayaker’s weight is not a concern. A video showing the KayaArms strength can be seen below3. How do you mount KayaArm onto a fixed/floating/metal/plastic dock?
See the “Additional Mounting and Use Instructions”4. What size deck screws do you recommend for fastening KayaArm onto a wood dock?
We use four to six 2” to 2.5” deck screws with 2 in the flange holes below the angle and 2 to 4 in the angle itself. If you are attaching the KayaArm to a 1.5” thick piece of 2×6 that has been fastened to a metal or plastic dock, you may only need 1.5” deck screws to avoid having the screws bottom out against the metal or plastic.5. Does the KayaArm work with wide kayaks, sit on top kayaks or heavier pedal & wider fishing kayaks?
Sit on top Kayaks:Yes, the KayaArm works with a sit on top equally as well as with a sit in kayak. Wide kayaks:
Several of our customers have reported they obtain good kayak entry/exit stability using the KayaArm on a 33” wide Hobie Outback.
.Another customer uses 29” wide Pongo kayaks and other wide fishing kayaks at his resort.
Pedal & Wider Fishing Kayaks:We have tested the KayaArm with both the Hobie Mirage Pro Angler 12 (132.5 Lbs, 36″ wide, 12 feet long) and the Wilderness Systems ATAK 120 (86 lbs, 35″ wide, 12-3″) attached are the videos and special considerations for installation.
132.5 lb, 36″ wide Hobie Mirage Pro Angler 12 View these videos:86 Lb, 35″ wide Wilderness Systems ATAK 120
View these videos:6. Can the KayaArm Be extended for wider kayaks?
Yes (Although it is rarely required since kayaks of up to 34″ have been used with the KayaArm without issue). The KayaArm can be extended by attaching a short piece of 1.5″ polyethylene pipe. The 1.5″ polyethylene pipe is cut to ~8″ and it is slit from one end ~5″. A stainless-steel gear clamp holds the pipe on to the arm. Below is a photo of the modification.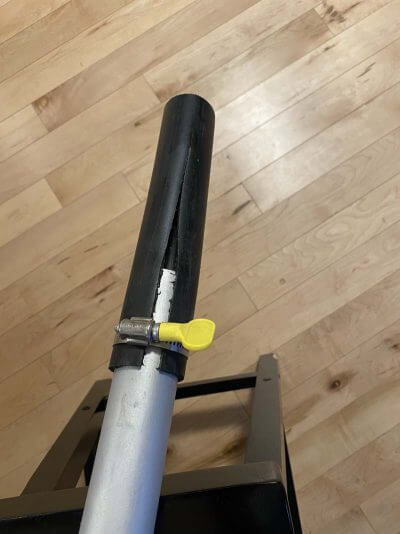
7. What is the maximum height above the water the KayaArm can be used?
The KayaArm (mounted on to the top of a dock) can be used up to a water level 30” below the top of the dock without modifications.8. Can the KayaArm be made longer for docks more than 30″ above the water?
The KayaArm out of the box utilizing the mounting angle can accommodate ~30” from top of dock to top of the water.If you’re the top of your dock to top of the water is greater than 30” there are several options:
- Simple Modification to the KayaArm Mast:
Modify the KayaArm by moving the mounting angle bracket higher up on the mast and requires 4 additonal ¼” holes to be drilled in the flange of the KayaArm mast. This method preserves the mounting angle attachment for mounting the KayaArm which is easier to mount and remove eg. in winter and is recommended for drops up to ~42” from top of dock to top of water. There are two methods for doing this modification and they are explained in detailed videos:
a. Method 1 – if you buy one KayaArm you need to measure the location of the new holes explained in this video:
b. Method 2 -if you buy two KayaArms (this method is slightly easier as you and use one mast as a template for locating the new holes to be drilled explained in this video:
- Pier or Ladder Mount
Attach the KayaArm to an existing vertical member of your dock for example an existing ladder or wood piling (post/column/pier). In this case the angle mounting bracket is not used to mount the KayaArm. This option is best in applications when Kayak Lanich stability applications where only one KayaArm is purchased. Using this method the KayaArm can be used for drops greater than 42”. In applications where Stability + Lift/Hoist & Storage is desired see #3 box beam mount below:
a. To mount the KayaArm to a wood piling use the existing holes in the mast for the angle mounting bracket to attach the KayaArm mast to the vertical pier
b. To mount the KayaArm to a ladder there are two holes provided in the side of the mast and the installer will need to use these holes to bolt or screw to a ladder. Attached below is a picture of the KayaArm mounted to an Aluminum ladder. Two holes were drilled in the aluminum ladder to match the holes in the KayaArm mast. In the case of a typical wooden ladder constructed of 2”x4 “ lumber the KayaArm can be easily screwed through the two holes provided into the ladder. Verify the ladder can support 2x the weight of the paddler.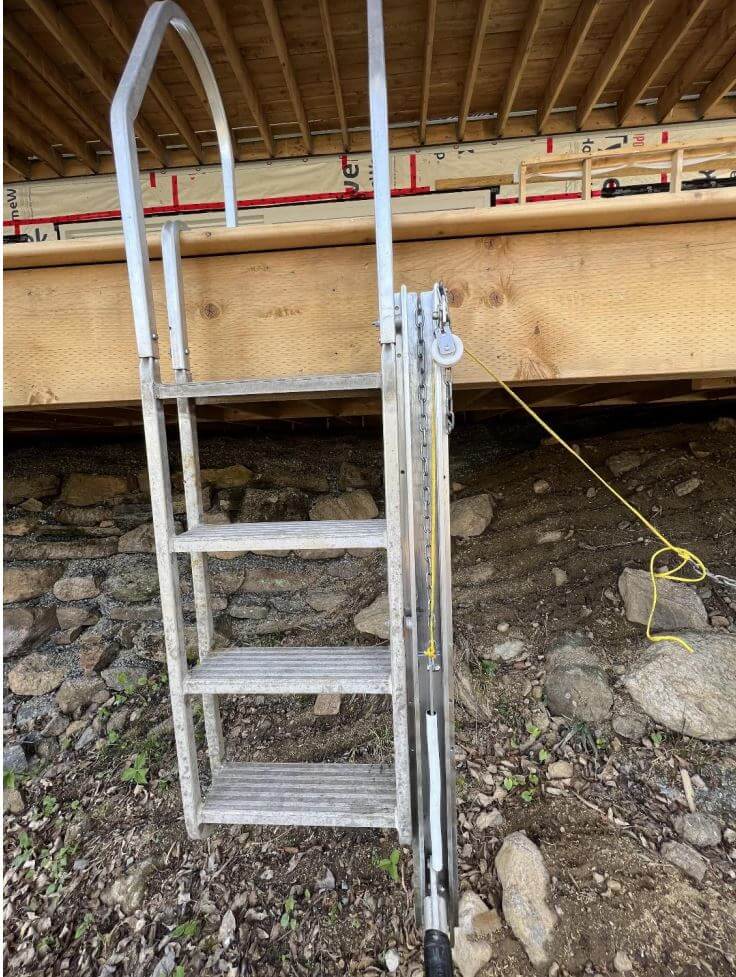
- Box Beam Mount:
Construct a box beam mount and attach it to your dock to provide a vertical support for your KayaArm. A box beam is constructed from materials readily available from most hardware stores (2×4 and 2×6 pressure treated lumber and stainless steel screws). The box beam is recommended when two KayaArms are mounted on a dock when kayak launch stabilization + Lift/Hoist and Kayak Storage capability is desired. Here is a picture of a box beam mount. The front and back are constructed from 2”x6” pressure treated lumber and the sides are constructed from 2”x4” pressure treated lumber. They are attached using 3” stainless steel screws and bolted to the dock using bolts or structural lag screws. The box beam assembly is 24”-30” long and this installation can be used to accommodate ~48” however it should be noted that the mast is 47.5” long and when the KayaArm mast is mounted with the top ~12” above with the top of the dock the top of the Kayak will be approximately flush with the top of the dock. To grab on to the KayaArm chains and facilitate better body mechanics when lifting from for hoisting a kayak we strongly recommend the construction of a jig described in this video:
- Dock Modification:
Install a horizontal structural member closer to the water level and mount the KayaArm to the horizontal member using the KayaArm mounting angle bracket. This modification will allow the KayaArm to be used in applications that have a drop greater than 42”. Customers with typical pier type docks have taken two approaches:
a. Lag bolt a horizontal 2×8 that spans from one pier to the adjacent pier closer to the water and mount the KayaArm(s) to the horixontal 2×8.
b. Construct a small stepdown platform closer to the water and mount the KayaArm on the step down platform. This is a very simple and elegant solution where two 2×8 are lag screwed on the front and back of two adjacent piers and 2×6 are then used as decking to across the 2×8 to crease a small step down platform as shown in this drawing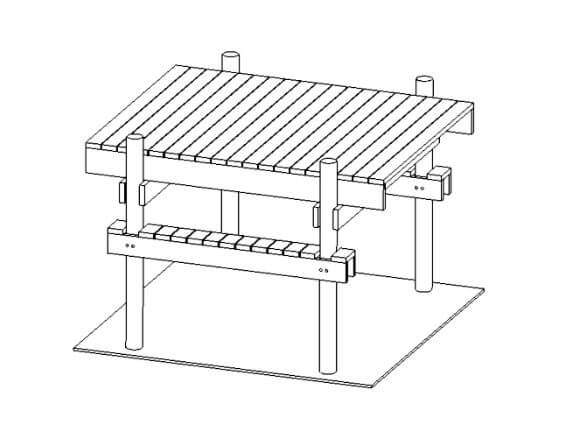
9. Can the KayaArm be used in applications where the top of the dock to the top of the water is greater than 42″?
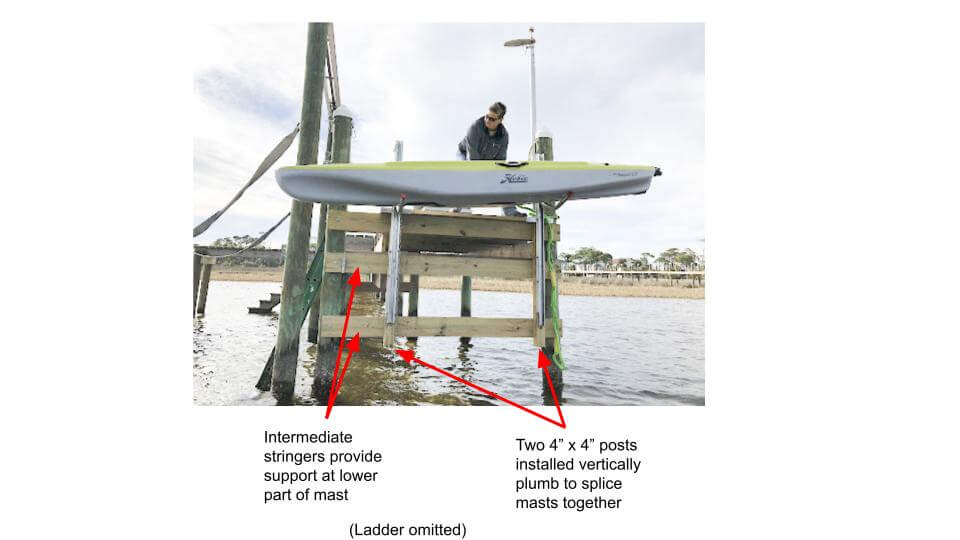
Yes it is possible however this is a more advanced installation requiring careful planning and precise installation. In this case two KayaArm masts are spliced together and additional support is required at the lower part of the mast and it is imperative that the masts are installed plumb in all directions. In typical installations many customers attach a second stringer between two piers parallel to the dock stringer (to provide the support at the lower part of the mast) and install a 4″x4″ post plumb in all directions to splice the two masts together. Please contact us a info@KayaArm.com for special order instructions.
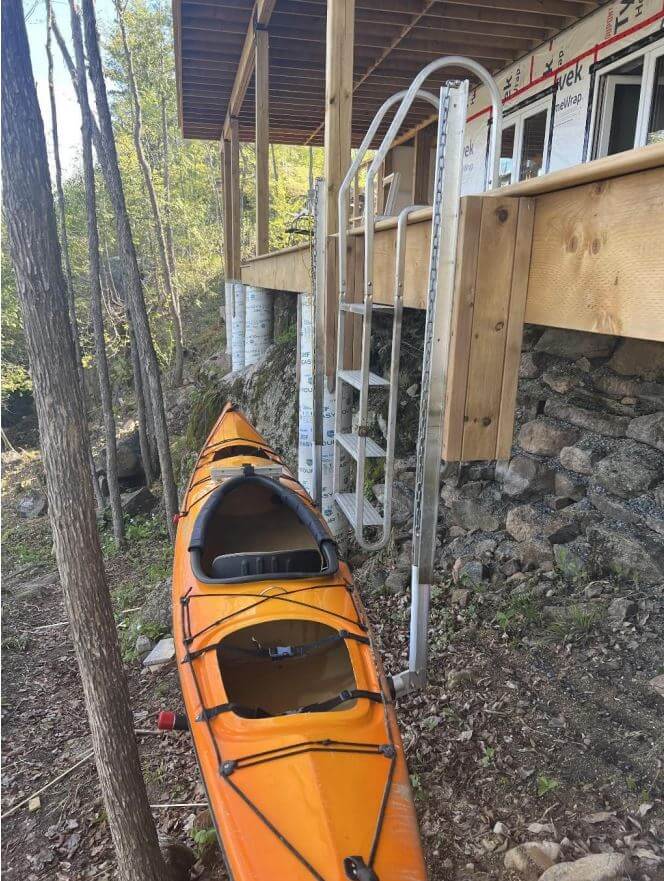
This picture shows a typical installation (Ladder has been omitted). The customer installed 2 intermediate stringers between the dock piers and two vertical 4″x4″ to splice the two masts together. In this installation a second mast was purchased and cut in half and the resulting mast lengths are 6′.
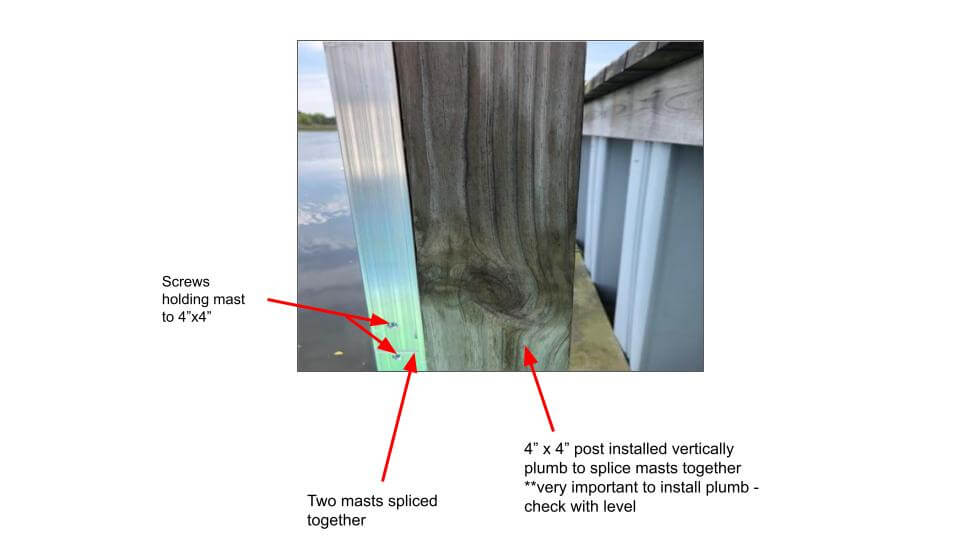
This picture shows how the KayaArm masts can be spliced to accommodate installation where the distance from the top of the dock to the low tide level is greater than 42″
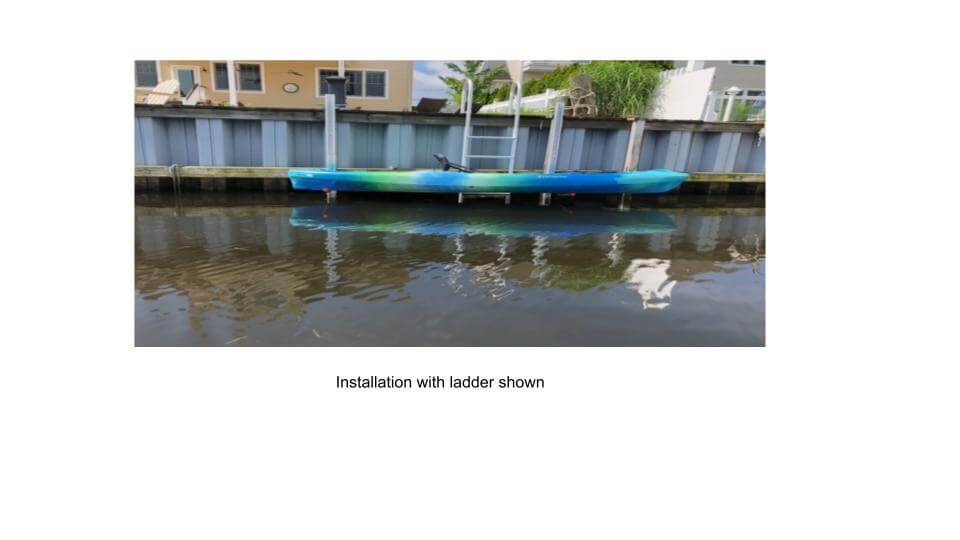
This picture shows a typical installation (Ladder has been shown). The customer installed two vertical 4″x4″ to splice the two masts together. In this installation a second mast was purchased and cut in half and the resulting mast lengths are 6′.
10. How can I add even more stability to my KayaArm?
For customers who are looking for extra stability we recommend the “Added Rope Feature”. It consists of adding a rope from the kayak seat mount to a dock cleat to keep the kayak from sliding back on the KayaArm arm during entry/exit maneuvers. The video below gives a demonstration of this technique. You can read more about it at the end of the page here https://www.kayaarm.com/additional-mounting-and-use-instructions-for-the-kayaarm-at-the-dock/#mounting-instructions)11. Wouldn’t two KayaArms provide more stability than one KayaArm?
No. If you tried to use two KayaArms you would get hung up at launch and not be able to slide off the arms.For information on how KayaArm is used checkout the “KayaArm Assembly Instructions” and our YouTube page for more videos.
See video below for more information…
12. My kayak is heavier than most kayaks how hard is it to lift using the “Lift and Dock Storage” Package (two KayaArms)?
Everyone has different strength levels so this will vary per user. To make lifting your kayak with the KayaArms easier we have three main recommendations.
- It is important to minimize friction by installing the KayaArm plumb and level using the shims and procedure provided in the installation instructions and video.
- It is beneficial to apply waterproof grease on the shoe, so it slides freely in the channel.
- A jig for lifting the chain can easily be made to allow you to use both hands to lift from a neutral position (not bent over) and is described in the videos below. Although it is still a manual lift, lifting from a neutral position with two hands will make it easier.
Below is a video of how a customer uses a jig to lift her Hobie Eclipse Pedal Board with two KayaArms.
13. Will the KayaArm work with a Pedalboard or Paddleboard?
Yes. We have multiple customers who use one KayaArm to stabilize getting in and out of their boards or two KayaArms for lifting and storing their boards at the dock. The first two videos show one of our customers using the KayaArm for entry and exit of her Hobie Eclipse Pedalboard as well as raising it at the dock with a jig. The third video demonstrates how to use the KayaArm for a stand-up Paddleboard.
14. Can the arm be removed from the mast?
An important feature of KayaArm is that the KayaArm and shoe assembly can be lifted out of the mast. The arm and shoe are tethered by the chain to the top of the mast so they can be slid out the top of the mast and placed onto the dock or left to hang in the water beside the dock thus enabling that dock space to be used for other purposes.
15. After launching a kayak using KayaArm how do you deal with a tide level change (which requires an arm height adjustment) upon return a couple hours later?
A “Tide Pulley” can be used to solve this problem. When affixed to one of the attachment holes at the upper end of the KayaArm mast, the Tide Pulley enables height adjustment of the KayaArm arm that may be needed due to tide level changes upon return from a kayaking excursion.
A video demonstration of the Tide Pulley can be found below.
Figure 1 Close-up of the Tide Pulley on the KayaArm

16. Can the KayaArm be used for entry/exit of a canoe? Can it be used for hoisting and storing a canoe?
Entry/Exit of a canoe
Yes – but there is a specific paddler order entry for this to work, a video showing how to do this can be found here.
The person in the front should be the first person to enter and the last person to exit the canoe.
Hoisting & Storing of a CanoeAlthough the KayaArm was designed for a Kayak it is possible to use two KayaArms for hoisting & storage of a canoe and it is important to get the set up right. Everyone has different levels of balance and strength and willingness to experiment when installing a set up for a canoe to get something that works for their specific canoe and we have made the video posted below so you can see what we have done and judge whether this solution works for you.
A canoe is wider than a kayak and you may need to mount the KayaArms out from the dock using 2X8 blocking as the middle of the canoe may interfere with the dock – you can see there is a little interference on the video when our canoe is lowered – not a big deal for our canoe but may be a consideration for wider & shorter canoes.
It is very critical for the mast to be well supported by your dock and installed plumb & level. You will note in the KayaArm installation video that there are two points of contact between your dock and the KayaArm mast, the mounting angle is the upper mount and the horizontal screws 4″ below the angle (shown at the 42 second mark of the installation video) is the lower mount. For heavier canoes moving the lower support as low as you can will allow your dock to support the KayaArm better and reduce the friction when hoisting. It is also very important to make sure the KayaArms are installed plumb and level and well secured and supported by your dock.
To reduce friction when hoisting a canoe it is beneficial to apply a marine grease on the back of the shoe, so it slides freely in the channel. Initially during set up we suggest a couple of drops of regular (or synthetic) motor oil in the top of each channel allowing the oil to flow by gravity into the channel and a small bead of oil on the top of the shoe as you pull it up the must . The intent is to apply a very light coat on the mast surfaces (any excess should be wiped up and not allowed into the environment) allowing it to work into the dry surfaces first while the arm is unloaded and then while loaded with the canoe followed by a light coat of marine grease.
A jig for lifting the chain can easily be made to allow you to use both hands to lift from a neutral position (not bent over) and is described in the video below. Although it is still a manual lift, lifting from a neutral position with two hands will make it easier.
We have had several customers report great success and satisfaction with the KayaArm solution for hoisting and storing their canoe. For some it may take some perseverance and experimentation to get the set up right and learn the technique to flip your canoe.
Below is a video demonstrating how the KayaArm system can be used for a canoe.
17. Would an overhead horizontal arm attached to the mast be an improvement? That way someone could hold onto it while getting in or out of a kayak.
In short, no. Entering and exiting the kayak by pushing straight down “locks” the kayak into place on the KayaArm.
We have installed and personally tested a horizontal arm design but instead of helping it is actually a hindrance. As noted in the “Suggested Operating Instructions” while maneuvering in your kayak it is best to not grip the dock or the mast (or any horizontal bar fastened to the mast) until standing and ready to exit.
The technical reason is that static friction between the bottom of the kayak and the KayaArm arm provides much greater stability than dynamic friction. By pushing, pulling or bracing on any fixed objects outside the kayak you cause the kayak to slide on the arm which changes the frictional contact from static friction to dynamic friction. This friction thing is also the reason that the Added Rope Feature is very effective in increasing stability as it prevents the kayak from sliding on the arm.
18. Can I lock my kayak onto the KayaArms?
There are sports lockable tie-down straps with stainless steel cables that are commercially available that can be used to securely lock your kayak onto your KayaArms for storage.
19. Do you offer money back guarantee if the KayaArm doesn’t work out for us? Do you have a return policy?
Just simply return KayaArm product in it saleable condition with all the parts in the original packaging at your expense, including any brokerage fees, within about 30 days (longer if you need more time to get it installed…e.g. need to wait till ice is out) and we will refund the amount you paid for the product.